Creating webhooks

2025-09-22Last updated

To notify interested parties when specific events occur, account administrators can create webhooks in Genetec ClearID™ to integrate with third-party solutions APIs.

What you should know

  • External organizations are responsible for developing their own third-party solution APIs (programs or applications) that consume ClearID webhook HTTP callback notifications.

Procedure

  1. From the Home page, click Administration > Webhooks .
  2. Click Add webhook.
  3. In the General section:
    1. (Optional) Select Enabled to enable the webhook.
    2. Enter a name to identify the webhook.
      For example, 'Identity updated' or 'Identity requests created webhook'.
    3. Enter a Description that describes the purpose of the webhook.
      For example, what the webhook is for and what API (program or application) it notifies when events occur.
  4. In the Webhook details:
    1. Enter the URL for your API.
      URLs must include HTTPS and can include ports and query parameters:
      • Example 1: https://my-api.com/identityupdatedendpoint
      • Example 2: https://my-api.com:8080/identity-updated-endpoint?my-query-param=123
      This URL is used to forward the webhook event notification to the relevant third-party API (program or application).
      Note:
      Your organization is responsible for providing the URL that you want the webhook event notifications forwarded to.
    2. (Optional) Enter the secret (App key) for authentication.
  5. (Optional) In the Additional headers:
    Extra custom HTTP headers can be added in the HTTP callback request. These custom headers can be used by the third-party API on the user's side of the integration.
    1. Enter the header parameter name.
      If you had one event coming from multiple sources, extra HTTP request headers could specify where event is coming from (ClearID or external API).
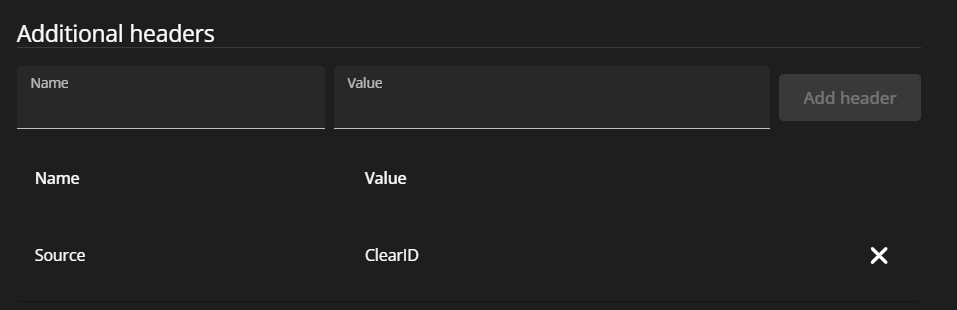
      Additional headers section of the Webhook details page in ClearID showing an example additional header Name and Value.
    2. Enter the header parameter value.
    3. (Optional) Click Add header to add extra HTTP request headers as required.
      For example, if your API is expecting or requires a specific set of headers (Host, Origin, Language, and so on).
    4. (Optional) Click to remove headers.
  6. In the Event section, configure your settings:
    1. Select an event to trigger the webhook.
    2. Click Download schema and follow your browser prompts.
      Best Practice:
      Use the downloaded schema information to understand the data structure of the events so that they can be retrieved and processed correctly on the user's side of the integration.
      The following example shows an extract from a schema-identitycreated.json file:
      {
        "$schema": "http://json-schema.org/draft-04/schema#",
        "title": "IdentityDeletedCallbackModel",
        "type": "object",
        "additionalProperties": false,
        "required": [
          "AccountId",
          "IdentityId",
          "DeletedBy",
          "DeletionDateUtc"
        ],
        "properties": {
          "AccountId": {
            "type": "string",
            "description": "The account id for which this identity is member of.",
            "minLength": 1
          },
          "IdentityId": {
            "type": "string",
            "description": "A unique id to identify the identity.",
            "minLength": 1
          },
          "ExternalId": {
            "type": [
              "null",
              "string"
            ],
            "description": "External ID"
          },
          "Ordinal": {
            "type": [
              "integer",
              "null"
            ],
            "description": "Commit ordinal in the storage.",
            "format": "int64"
          },
          "Email": {
            "type": [
              "null",
              "string"
            ],
  7. Click Save.

After you finish

Using the downloaded schema, configure your third-party API to receive and process the webhook notifications.