
Configuring synchronization settings
2026-05-06Last updated
To automate identity processing and manage web portal access for synchronized users, IT and security personnel can define synchronization intervals, picture handling, and error-reporting rules in the One Identity Synchronization Tool.
Before you begin
- Check your license information: Part number CD-IDSYNC-SERVICE-1Y is required for One Identity Synchronization Tool import.
- Make sure that your files are not open or being edited. The tool locks the file during the synchronization process.
What you should know
- Synchronization can be performed manually using the
Synchronize now (
 ) option, or
automatically at the Automatic synchronization intervals
specified in the One Identity Synchronization Tool.
) option, or
automatically at the Automatic synchronization intervals
specified in the One Identity Synchronization Tool. - Synchronization of external system attributes into ClearID identity attributes is INBOUND only.
CAUTION:
Any changes only made to identities in ClearID can be overwritten
during the next synchronization from the external system.
Procedure
-
In the One Identity Synchronization Tool Synchronization
section, configure your synchronization settings.
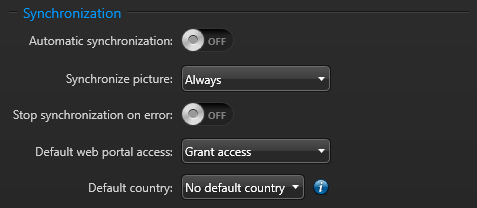
- Automatic synchronization
- Enable this option to synchronize attributes at regular intervals.
- Interval
- If automatic synchronization is enabled, choose a synchronization interval:
- Fixed
- Enter a Synchronization interval using the following format:
000d 01h 00m 00s.
For example, every 7 days would be 007d 00h 00m 00s, or every 12hrs 000d 12h 00m 00s.
- Cron Schedule
- Enter a synchronization interval using the Quartz Cron format. For
example, 00***?*.
For more information, see quartz-scheduler.org/documentation.
Click Synchronize now (
) to trigger a manual synchronization,
regardless of the scheduled settings. - Synchronize picture
- Choose when to synchronize identity pictures from the external system.
- Always
- Synchronizes pictures during every synchronization.
- Only if missing
- Synchronizes only when the picture is missing.
Including pictures increases the amount of time that it takes to import attributes.
- Stop Synchronization on error
- Enable this option to stop synchronization if an error is encountered during the synchronization process.
- Default web portal access
- Specifies web portal access for synchronized users.
- Grant access
- Enables ClearID web portal access for users by default.The username field must be mapped to give web portal access to a ClearID identity.
- There are only two possible values for the User type mapping: Admin and User. Any other value entered defaults to User.
- If the mapping for web portal access is not set, or the value is empty, the Default web portal access global setting is used.
- No access
- Disables web portal access by default.
- Default country
- Choose one of the following:
- No default country
- If a synchronized identity does not include a country attribute, the country attribute is ignored.
- Default country
- Select a default country. If a synchronized identity does not include a country attribute, the synchronized identity uses the default country specified here.